


The Easter Bunny will be here soon!

A friend and I got together to make these fun little Easter treats for the kids.
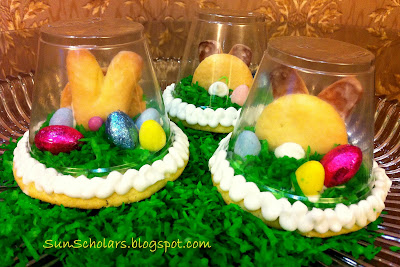
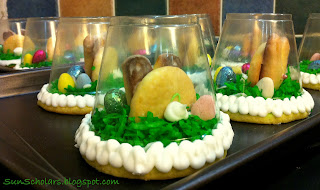
Simple and unique. And the kids LOVE them!

Bunny Fronts... or Bunny Behinds!

Months back I came across this adorable idea for a winter version. I had wanted to do something like this for Christmas SO BAD, but I was having a hard time finding all of the supplies I needed here in China.

Edible Snowglobe Place Settings at Suzy's Artsy-Craftsy Sitcom
So with my husband's last business trip to the US, I had him stock up on Easter treats.. and this is what I came up with! A perfect Easter treat to share with the kiddos in our lives!
So with my husband's last business trip to the US, I had him stock up on Easter treats.. and this is what I came up with! A perfect Easter treat to share with the kiddos in our lives!

Here's the how to... but please know, you can improvise to make this even more simple!!
**FYI**
I had originally hoped to stick some cute little foil-wrapped bunnies inside... not the sugar cookie bunnies I had to whip up in their place. The downside of having to rely on your husband to shop for your supplies. He obviously couldn't "see" my vision. So there is NO REASON you need to go to the trouble to make little bunnies when you can buy some cute alternatives in the Easter isle at the grocery store!
Edible Easter Spring Globes
Supplies Needed
- SOLO Clear Plastic Cups
- Sugar Cookies
- Easter Candies (candy eggs, foil wrapped critters)
- Icing Glue (see recipe below)
- Coconut (I used sweeetened)
- Frosting (I used a white, Betty Crocker vanilla frosting)
- Green Food Coloring
Directions

I use THIS recipe, but any recipe will do. I roll mine between 1/4" and 1/2", then cut circles using one of the SOLO cups I will use for the "globes". These are kind of flimsy to use as cookie cutters, so you may opt to find another cup with a similar size. Let cookies cool completely!
... AND, if you are digging the cookie bunnies, and would rather make these instead of using a foil-wrapped bunny in your globe, here is how I made mine. (I didn't have a bunny cookie cutter, so I had to improvise!)
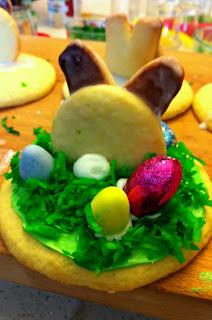
My bunnies were made out of two cookies. I cut rounds using a shot glass, and sliced off a bit to make a flat bottom, to use as the body. The second cookie, for the head, I cut rectangles like you see below.

I hand shaped the corners to make a round head at the bottom, and rounded ears on top.
2. Prepare Icing Glue
I use the same recipe as I would for gluing together my gingerbread houses. This recipe was enough to complete about 10 globes.
Icing Glue
- 2 cups Powdered Sugar
- 1 Egg White
- 1/4 tsp Cream of Tartar
- Green Food Coloring
Combine the powdered sugar, egg white, and cream of tartar in a bowl and mix well (I use my hand blender). Add a little bit of green food coloring to get the color you want. If the mixture is too dry, add a little bit of hot water until you get the right consistency. If the mixture is too wet, add more powdered sugar.
You want the icing to be thick enough that it will hold it's shape, but not so thick that it is impossible to squeeze from a piping bag!
Transfer your icing to a bag (a ziplock bag will do).
3. Grab the Green Food Coloring!

Put your coconut in a bowl, add green food coloring and mix until you get the color you want. We spread some of the coconut (after coloring) onto a baking sheet at a low temp (about 250F) for a bit to toast it. It gave us the darker, crunchy coconut flakes at the bottom of the photo. I think that in the end, I liked how the moist coconut looked best.
Tint your frosting green as well. For this project I did not tint my icing glue green, but afterwards I was wishing that I had!
4. Build Your Display
If you are using solid chocolate or foil wrapped bunnies (or chicks), you can use a little icing glue to attach them to the cookie base. Make sure your cup will fit over top!
If you opted to make your own bunnies, as I did, you will need to "glue" them together. I used my icing glue to attach the head to the body, as you see in the photos below. I then "glued" the bunny to the cookie base (again, making sure my cup would still fit over top of each).
Give your these some time to dry so the glue can harden a bit before you move on.
Now... we did a crazy thing. We mixed a thin glaze frosting, using only icing sugar and milk, and painted over our bunnies. This is not necessary, and didn't make a huge difference, but you can see the results of doing so in the images below.
Once the bunnies are set, frost the base of each cookie around your bunnies using your green tinted frosting (not the icing glue). Make sure to stay a bit from the edges, so your cup can be attached to the cookie base, and not over top your grass.
Place some coconut grass over top of the frosting, add a bunny tail (and nose if you wish... I used icing glue for both), and some Easter eggs. I "glued" all of these on with my icing glue, but you may find that sticking them into the frosting grass is enough.
4. Top it Off!
Snip a small bit off of the corner of your icing glue piping bag. Run a line of icing glue around the rim of the cup, as in the photo below:
Now, as I mentioned above, it would have been better my icing glue was green so this frosting wouldn't be so obvious.
Carefully place the iced cup rim down onto your cookie base and gently press into place. If you have any wild blades of coconut grass poking out, go ahead and remove those.

To add a nice, finishing touch, I piped a zig-zag around the bottom of each cup. Not only did this make it look even more snazzy... it hid the white "glue" that I had wished I made green in the first place!
And there you have it!


And here is one happy little girl...

I think these would make great place settings, classroom treats, favors, Easter basket goodies... the list goes on! I also think that they would be a great activity for the kids. I'm sure they would love making these.
I hope you give them a try!!


No comments:
Post a Comment